DOCUMENTATION

KRISPYGAUGE Support & Setup

Everything you need to wire, configure, update, and troubleshoot your KrispyGauge.

GETTING STARTED

Setup Guide.

Get your KrispyGauge wired up and talking to your Haltech ECU in 3 easy steps.

01

Wiring

KrispyGauge connects via a JST XH 2.54mm pitch 4-pin connector and includes a JST XH cable in the box. The cable can be used as-is to daisy-chain multiple KrispyGauges on the same CAN bus, or the open end can be chopped and terminated into a DTM connector or spliced directly into your existing loom. Connect the four wires as shown below.

KrispyGauge Wire Connect To
12V  (RED) Switched 12V supply (ignition-switched)
GND (BLACK) Chassis ground / ECU ground
CAN H (YELLOW) Haltech CAN High
CAN L (GREEN) Haltech CAN Low

Always use an ignition-switched 12V source so the gauge powers on and off with the car. Do not connect to a permanent live battery feed.

Double-check your wiring before powering on. Reversing power polarity (12V/GND), creating a short, or accidentally applying 12V to the CAN H or CAN L pins can permanently damage the gauge and will void your warranty. Take care to verify each wire against the table above before connecting power.

Orientation: Install the gauge with the USB-C port on the right when viewed from the front, which puts the 4-pin JST connector on the top half of the gauge. There is also an arrow marked on the back of the unit showing which way is up.

120Ω Termination Resistor: KrispyGauge has a software-based 120Ω termination resistor built in, which you can switch on in the Web UI settings. Whether you need it depends on where the gauge sits in your CAN bus network and whether your Haltech ECU already terminates the bus. Try with it off first — only enable it if you experience communication issues.

02

First Boot

With power and CAN wiring connected, KrispyGauge starts up automatically when the ignition is on:

  1. The display shows the KrispyGauge boot screen for ~2 seconds
  2. The gauge listens for an active Haltech CAN signal on the bus
  3. Once CAN data is detected, the default gauge face appears showing RPM
03

Customise via Web UI

With the gauge running, connect to its built-in WiFi hotspot to customise the gauge channel, warning thresholds, colour themes, and CAN Keypad button functions — all from any phone, tablet, or laptop.

  1. On your gauge, go to Menu > Info to view the hotspot SSID and password
  2. By default the SSID is Krispy_XXXX (unique to your gauge's MAC address) and the password is GetKrispy
  3. Connect your phone, tablet, or laptop to that WiFi network
  4. Open a browser and navigate to http://4.3.2.1

See the Web UI Access section below for full details.

WIRELESS CONFIGURATION

Web UI Access.

Configure KrispyGauge from any device — no app required.

1

Power on the gauge

Turn on your vehicle's ignition. The KrispyGauge WiFi access point activates automatically on every boot — no pairing needed.

2

Connect to the KrispyGauge WiFi network

On your phone or laptop, open WiFi settings and connect to:

SSID Krispy_XXXX

The suffix is derived from your device's unique MAC address. The full network name is shown on the gauge display at boot.

Password GetKrispy
3

Open the Web UI in your browser

Navigate to:

URL http://4.3.2.1

If the page doesn't load, confirm you're connected to Krispy_XXXX and that mobile data is disabled on your phone — the OS can route traffic over cellular when WiFi has no internet access.

4

Configure your settings

The Web UI lets you fully customise:

  • Gauge channel selection (RPM, boost, AFR, coolant temp, oil pressure, and more)
  • Colour themes and display styles
  • Warning threshold levels and alert colours
  • CAN Keypad button labels and assigned ECU functions
  • Screen brightness and idle timeout
  • WiFi network settings
  • Firmware OTA updates

CONFIGURATION

ECU Type.

Select the ECU protocol that matches your setup before configuring anything else.

01

Selecting Your ECU Type

In the KrispyGauge Web UI, navigate to the Settings page and select your ECU type. KrispyGauge supports the following protocols:

  • Haltech — Native CAN bus support for Elite & Nexus series
  • OBD — OBD-II diagnostics protocol (ISO 15765-4 only)
  • Link — CAN bus support for Link ECUs (Beta)
  • MaxxECU — CAN bus support for MaxxECU systems (Beta)
  • Holley — CAN bus support for Holley ECUs (Beta)
  • Megasquirt — CAN bus support for Megasquirt ECUs (Beta)
  • AEM — CAN bus support for AEM ECUs (Beta)
  • EcuMaster — CAN bus support for EcuMaster ECUs (Beta)
  • Emtron KV/SL Series — CAN bus support for Emtron KV and SL series ECUs (Beta)
  • rusEFI — CAN bus support for rusEFI ECUs (Beta)
  • Syvecs S6/S7 — CAN bus support for Syvecs S6 and S7 ECUs (Beta)
  • NMEA 2000 — Marine network protocol (Beta)
  • TurboLamik TCU — CAN bus support for TurboLamik transmission control units (Beta)
  • AEM-30-2224 Thermocouple Box — 8-channel EGT thermocouple module over CAN (Beta)
  • Haltech TCA4 & TCA8 — 4- and 8-channel thermocouple amplifiers over CAN
  • AEM-302226 6-Channel Sensor Module — 6-channel analogue sensor module over CAN (Beta)
  • Haltech WB1/WB2 Wideband Controller — single and dual channel wideband lambda controllers over CAN (Beta)
  • Custom CAN — any other CAN bus, read with a profile you build or download. See below.

Changing ECU type will wipe your existing configuration. All channel assignments, warning thresholds, display settings, and keypad button mappings will be reset. Set your ECU type first — before configuring anything else.

View the full list of supported signals for each ECU in the ECU Signal Documentation.

Running OBD/EOBD? See the Supported OBD2/EOBD Vehicles list for makes and models confirmed working.

ECU or device not listed? Choose Custom CAN and install a profile that tells the gauge where each value sits on the bus. Build one, or download a ready-made one, with the Custom CAN Profile Builder, and see the format guide for how profiles work.

FEATURE GUIDE

CAN Keypad Emulation.

KrispyGauge can emulate a Haltech CAN Keypad, giving you up to 8 configurable buttons directly on your gauge touch screen — no physical keypad required.

01

Selecting a Keypad Layout

In the KrispyGauge Web UI, navigate to the Keypad settings page. You can enable emulation of one of two keypad identities:

  • 2×4 Keypad A — emulates a Haltech CAN Keypad with ID set to A
  • 2×4 Keypad B — emulates a Haltech CAN Keypad with ID set to B

Once enabled, KrispyGauge will appear on the CAN bus as a native Haltech keypad of that type, and you can assign actions to each button directly within Haltech NSP.

Conflict Warning — Physical Keypad: If you already have a physical Haltech CAN Keypad connected to your vehicle, do not enable the same keypad ID on your KrispyGauge. Two devices sharing the same keypad ID on the same CAN bus will cause interference and unpredictable button behaviour.

Conflict Warning — Multiple KrispyGauges: If you are running two or more KrispyGauges on the same CAN network, do not assign the same keypad ID to more than one gauge. Each KrispyGauge must use a unique keypad identity (A or B). Emulating the same ID across multiple gauges will cause interference and unreliable operation.
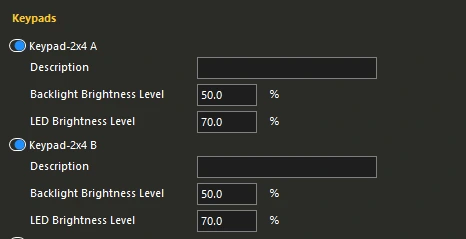
Haltech NSP — CAN Keypad button configuration
02

Configuring Buttons in Haltech NSP

Once the KrispyGauge keypad is enabled and appearing in NSP, configure your button actions as follows:

  • In NSP, navigate to ECU Settings → CAN Keypad and select the matching keypad identity (A or B)
  • Assign your desired function to each button slot (e.g. Boost Map, Traction, Cruise Control)
  • Set each button action to Momentary within NSP — let KrispyGauge handle the latching logic on the touch screen for the best experience

By Configuring actions as Momentary in NSP, you pass the control of this action to the Krispy Gauge, allowing the latching function to be managed by KrispyGauge. This gives clear on/off feedback and avoids state issues with the ECU.
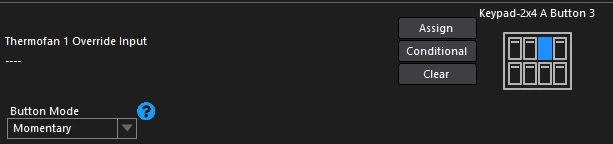
Momentary button mode in NSP
03

When to use Momentary Toggle?

In the KrispyGauge Web UI, each keypad button can be assigned a Momentary Toggle behaviour. This mode is designed for momentary actions where you want a clear on/off state tracked on screen, such as:

  • Traction Control adjustments
  • Cruise Control enablement
  • Map / boost level switching

Each tap sends a momentary pulse to the ECU while KrispyGauge manages the visual on/off state on screen — so you always know what's active without relying on the ECU to report back.

For functions that require a held press (e.g. scrolling through boost levels incrementally), use the standard Momentary mode — the ECU action fires for as long as the button is held on screen.

TELEMETRY

VRacer Integration.

Stream live CAN telemetry from KrispyGauge to the VRacer app over Bluetooth.

01

Enable VRacer Telemetry

Open the KrispyGauge Web UI and navigate to Settings. Enable the VRacer Telemetry option. Once enabled, KrispyGauge will begin broadcasting live CAN telemetry over Bluetooth, ready to be picked up by the VRacer app on your phone.

02

Disable WiFi Auto On

KrispyGauge shares its wireless radio between WiFi and Bluetooth. When WiFi is active, Bluetooth — and therefore VRacer telemetry — is disabled. For the best VRacer experience at the track, we recommend turning off WiFi Auto On in the CAN settings.

Whenever WiFi is disabled, Bluetooth will be active and VRacer telemetry will stream automatically. You can still toggle WiFi on at any time to access the Web UI — telemetry resumes as soon as WiFi is turned back off.

03

Connect in VRacer

Open the VRacer app on your phone and pair with KrispyGauge over Bluetooth. Live CAN telemetry will stream directly into VRacer for lap timing, channel graphing, video overlay, and session analysis.

VRacer

FIRMWARE

Downloads & Updates.

Keep your KrispyGauge current with the latest features, improvements, and bug fixes.

LATEST RELEASE

Krispy_Update.bin

Released 2026
Download .bin

Release Notes

  • Recommended Update
  • Patches wireless disabled on boot bug
  • Patches OTA updates
  • Enables BETA support for other ECU types

How to Update via Web UI (OTA)

  1. Download the firmware — save the .bin file to your phone or laptop.
  2. Connect to the Web UI — join the Krispy_XXXX WiFi and open http://4.3.2.1 in your browser.
  3. Open System → Firmware Update from the Web UI navigation.
  4. Choose the firmware file — tap Choose File and select the downloaded .bin.
  5. Upload & Flash — tap Upload & Flash. A progress bar will appear on the gauge screen during upload (~30–60 seconds).
  6. Wait for reboot — the gauge reboots automatically when flashing is complete. Do not cut power during the update process.

If the OTA update does not complete successfully the first time, simply try again — select the file and tap Upload & Flash a second time. This is normal and the update will proceed on the retry.

Keep the ignition on throughout the entire firmware update. A power interruption during flashing can corrupt firmware — use the USB Recovery method to restore a bricked unit.

TROUBLESHOOTING

USB Recovery.

If the Web UI is unreachable or the gauge is unresponsive, USB recovery can restore firmware directly.

USB recovery instructions are available on request. Get in touch at [email protected] and we'll walk you through the process.

Registered users can access the browser-based USB flash tool directly from the secure firmware portal — connect your gauge via USB-C and flash without any software.

USB Recovery

FREQUENTLY ASKED

FAQ.

Which Haltech ECUs are compatible?

KrispyGauge is compatible with all Haltech Elite, Nexus, and Rebel series ECUs that broadcast over the Haltech CAN protocol, including:

  • Haltech Elite series (Elite 550, 750, 1000, 1500, 2000, 2500)
  • Haltech Nexus series (Nexus R3, R5, R3 Sport, S2, S3, Universal)
  • Haltech Rebel series (Rebel LS, Rebel JZ)

Other Haltech models may work if they support the standard Haltech CAN broadcast — check your ECU documentation. Plenty of non-Haltech ECUs are supported too — see the next question, or the supported ECU reference for every signal we decode from each one.

Can I use KrispyGauge with a non-Haltech ECU?

Yes. KrispyGauge decodes Haltech, Link, MaxxECU, Holley, Megasquirt, AEM Infinity, Ecumaster EMU Black, Emtron, rusEFI, Syvecs, OBD2 and NMEA 2000 (marine). Select your ECU type in the Web UI settings before configuring anything else.

It also reads standalone modules that share the bus with your ECU and add channels it does not provide:

Every signal we decode from each one is listed in the supported ECU reference. Syvecs is listed as unverified — the decode is inferred rather than confirmed against a device, so check a known value before relying on it. If you have questions about a specific ECU, reach out at [email protected].

The gauge shows "NO CAN SIGNAL" — what do I check?

Work through the following checklist:

  1. CAN wiring — confirm CAN H and CAN L are correctly connected and not reversed.
  2. CAN broadcast — verify Haltech CAN Broadcast is enabled in Haltech NSP.
  3. Termination — the CAN bus requires 120 Ω termination at both ends. Most Haltech ECUs terminate the bus themselves; KrispyGauge has a software-based 120 Ω termination you can enable in the Web UI settings if your network topology needs it.
  4. ECU running — the Haltech ECU must be powered and in its run state to broadcast CAN data.
How do I back up and restore my gauge configuration?

It's a good idea to back up your gauge configuration regularly — especially if you have extensive customisations, custom channels, warning thresholds, or keypad mappings set up.

  • Backup — connect to the KrispyGauge hotspot, open http://4.3.2.1, and navigate to Advanced → Backup. Save the file to your phone or computer.
  • Restore — go to Advanced → Restore and upload your saved backup file to return to that configuration.

Keep a copy of your backup somewhere safe — it can save a lot of time if you ever need to factory reset or recover from a failed firmware update.

Do not edit or alter the backup .json file unless you fully understand its structure. Restoring a malformed or hand-edited .json can corrupt the gauge configuration and leave it unresponsive — potentially requiring a factory reset or USB recovery to recover. Keep your backups intact and unmodified.

Should I configure a custom WiFi name and password?

This is entirely optional — the gauge works fine with its default WiFi name and default password. However, if you plan to leave WiFi on for extended periods, we recommend setting a unique password to prevent unattended access to your gauge configuration.

You can change the WiFi name (SSID) and password under Advanced → Wireless Access Point. Keep the password simple enough to type on a phone but not something obvious.

Our general recommendation is to turn WiFi off when it's not in use using the Auto-Enable WiFi setting — that way you don't need to worry about a password at all. But if you prefer to leave WiFi on, a basic password is a good idea.

If you're unsure, the safest approach is: set up your gauge, then disable Auto-Enable WiFi. Enable WiFi manually only when you need to make changes.

Should I turn off Auto-Enable WiFi after setup?

Yes — once you've completed your initial setup, it's recommended to disable Auto-Enable WiFi in the gauge configuration (Web UI → Settings → WiFi).

Leaving the WiFi hotspot on permanently has two downsides:

  • Performance — running the WiFi radio continuously draws extra processing overhead. Disabling it when not needed keeps the gauge running at its best.
  • Security — an always-on hotspot means anyone within range could connect and alter your gauge settings, channel configurations, or warning thresholds without your knowledge.

With Auto-Enable WiFi off, you can still access the Web UI anytime by manually enabling WiFi from the gauge menu (Menu → WiFi → Enable). Turn it on when you need to make changes, then turn it back off when you're done.

We recommend disabling Auto-Enable WiFi once your gauge is fully configured. It takes two taps to re-enable when needed — and keeps your setup secure at the track.

How do I reset KrispyGauge to factory defaults?

A factory reset can be performed in two ways:

  1. Via Web UI — connect to http://4.3.2.1, navigate to Advanced → Reset, and confirm.
  2. On the gauge — from the main menu, hold the Info button for 3 seconds to open the Reset menu, then confirm the factory reset.

All custom channels, warning thresholds, and keypad configurations will be cleared and restored to defaults.

The Web UI isn't loading — what should I check?
  • Confirm you are connected to Krispy_XXXX — not your home, Haltech, or mobile network.
  • On Android, disable mobile data so the OS doesn't route traffic over cellular when WiFi has no internet.
  • Use http:// — not https://. The Web UI does not use HTTPS.
  • Try a different browser. Chrome or Firefox are recommended.
  • If the gauge recently suffered a failed firmware update, use USB Recovery to restore it.
Can I connect to the Web UI over my home WiFi or Haltech WiFi?

No. KrispyGauge does not join external networks — it runs its own dedicated WiFi hotspot (Krispy_XXXX) solely for configuration. To access the Web UI you must connect your phone or laptop directly to the KrispyGauge hotspot, then open http://4.3.2.1.

Home WiFi, Haltech WiFi, and other existing networks cannot be used to reach the Web UI.

How does CAN Keypad Emulation work?

KrispyGauge presents itself to your Haltech ECU as a native CAN Keypad device over the CAN bus. Configure keypad button functions in Haltech NSP exactly as you would for a physical Haltech CAN Keypad — KrispyGauge responds identically.

Up to 8 keypad buttons with custom labels can be configured via Web UI → Keypad. Tapping a button on the gauge touchscreen sends the corresponding CAN keypad command to the ECU. No separate keypad hardware is required.

Is KrispyGauge waterproof?

KrispyGauge is designed for interior cockpit installation in a standard 52mm gauge pod. It is not waterproof and is not rated for direct water exposure. Protect the unit from high-pressure washing, water ingress, or prolonged moisture. For motorsport applications in open cockpits, use a gauge pod with a protective visor or cover.

A Marine version is currently in development for exposed and high-moisture environments. If you have a special application or requirement, contact us — we may be able to provide an experimental unit for testing.

The gauge isn't receiving CAN data — what should I check?

Every KrispyGauge is individually tested on a real running Haltech Nexus R3 before it leaves the factory — so if your gauge isn't receiving CAN data, the issue is almost certainly in the installation rather than the gauge itself. Work through these checks:

  • CAN H / CAN L polarity — this is the most common cause. CAN H (Yellow) must connect to CAN H on the ECU, and CAN L (Green) must connect to CAN L. Swapping them will prevent communication entirely.
  • Termination resistor — try switching the gauge's software 120Ω termination on or off in the Web UI settings, depending on your network topology and whether your ECU already terminates the bus. See the note in the Wiring section above.
  • Haltech CAN broadcast — confirm it is enabled in Haltech NSP under ECU Settings → CAN Bus.
  • Wiring continuity — check for broken, shorted, or incorrectly crimped wires between the gauge connector and the CAN bus tap point.

If you've worked through all of the above and still have issues, contact us at [email protected].

Is there open source / community firmware available?

Yes — a barebones open source community firmware is coming soon. It's designed for savvy individuals and vibe coders who want to go deeper: make key changes to the codebase, adapt the gauge to a different platform or CAN protocol, build entirely custom gauge faces, or tailor the experience exactly to their needs.

Whether you want to add support for a new ECU, rework the UI, or build something entirely new on top of the KrispyGauge hardware — the community firmware will give you the foundation to do it.

Stay tuned — more details will be announced soon. In the meantime, reach out at [email protected] if you're keen to get involved early.

Can I suggest a new feature or improvement?

Absolutely — we love hearing from the community. Submit your idea using the Feature Request page. Just provide a title, a brief description, and your email and we'll review it.

I need help not covered here — how do I contact support?

Reach out at [email protected]. Include your order number and a detailed description of your issue for the fastest response.

There are also a number of additional troubleshooting steps and methods available — get in touch and we can walk you through them.